Introduction
One of the most interesting features of Arduino (if not the most) is its ability to interact with the physical world. For example, we can measure voltages, get readings from various sensors, control devices, or manage motors and actuators.
This interaction is largely achieved through the use of digital and analog inputs and outputs. On this page, we will learn how to use digital inputs as they are the simplest.
What are Digital Inputs?
A digital signal is a change in voltage between -Vcc and +Vcc without passing through intermediate values (e.g., 0V and 5V).
Therefore, a digital signal has only two states:
- The lower value (-Vcc) is associated with the logical value LOW or 0.
- The higher value (+Vcc) is associated with the logical value HIGH or 1.
In the physical world, electrical signals are continuous. The process of digital reading is the conversion of an analog measurement (the voltage value we measure) into a digital signal ("virtual").
Digital Inputs in Arduino
In Arduino, digital inputs and outputs share the same pins. For this reason, they are referred to as I/O (Input/Output).
This means that the same pin can perform the function of an input or an output, but not at the same time. The pin must be configured as an input or output in the program.
Arduino has a different number of digital pins depending on the model. For example, the Arduino UNO has 16 digital pins, while the Arduino MEGA has 54 digital pins.
Connecting Digital Inputs
Suppose we want to use Arduino to connect to a sensor or any other device that provides a continuous voltage signal between 0V and 5V.
We can read the voltage value from the sensor using the following circuit:
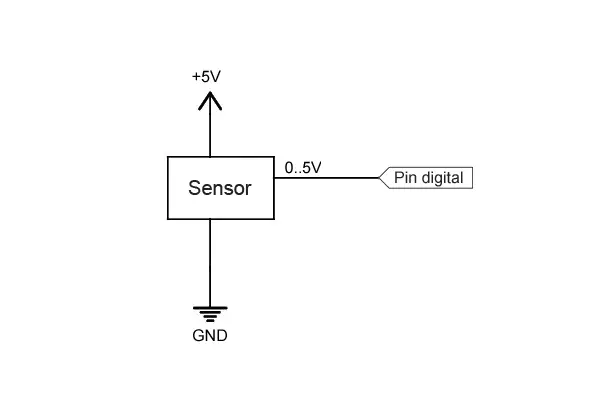
The reading will be:
- HIGH if the voltage value is greater than the threshold voltage (2.5V).
- LOW if the voltage value is less than the threshold voltage.
Code in Arduino
The code for reading digital inputs is very simple. We only need to configure the pin as an input using pinMode() and perform the reading using digitalRead().
int pin = 2;
int value = 0;

void setup() {
  Serial.begin(9600);   // Start serial communication
  pinMode(pin, INPUT);  // Configure the pin as an input
}

void loop() {
  value = digitalRead(pin);  // Read the digital pin

  // Send a message based on the read value
  if (value == HIGH) {
      Serial.println("On");
  } else {
      Serial.println("Off");
  }
  delay(1000);
}
Reading Values Greater Than 5V
Never input a voltage outside the range of 0V to 5V into an Arduino pin, as it may damage the pin.
If we want to measure a voltage higher than 5V, we can use a voltage divider to reduce the voltage to a safe range.
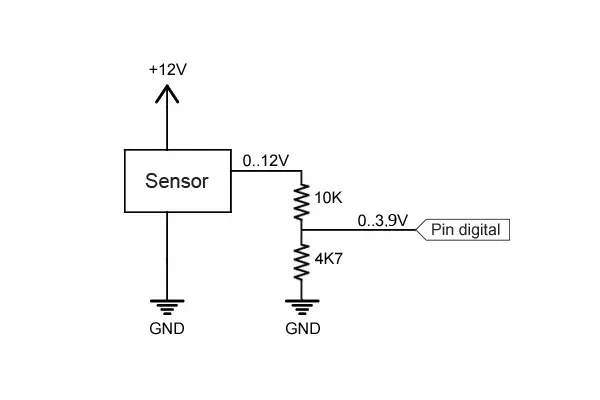
In this case, the digital pin will receive a voltage between 0 and 3.84V, which is within the safe range.