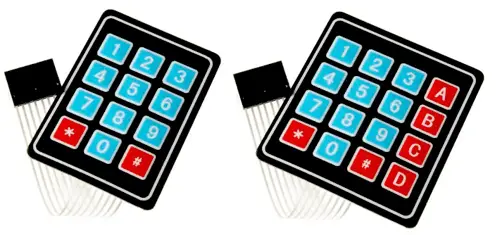
What is a Matrix Keyboard?
A matrix keyboard is a grid of buttons connected in a matrix layout of rows and columns. This arrangement reduces the number of pins needed to control a large number of buttons, making it a cost-effective solution for many applications.
Price
Matrix keyboards are affordable and can be found for as little as €0.45 on platforms like AliExpress or eBay.
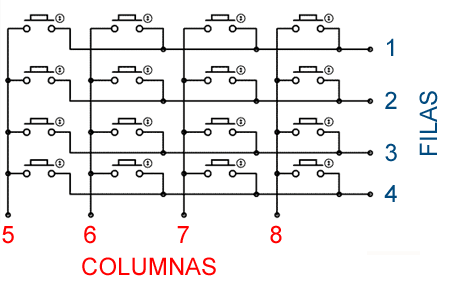
How Does a Matrix Keyboard Work?
By scanning through rows and columns, you can detect which button is pressed. This involves grounding one row at a time and reading the input from the columns. The process is repeated for all rows, making it efficient and straightforward.
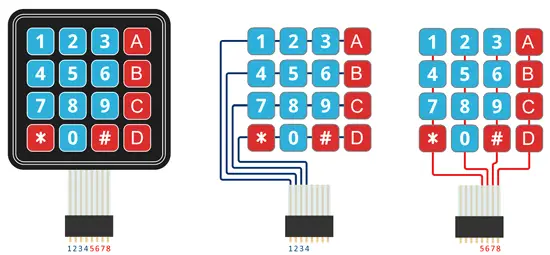
Connection Diagram
Connect the rows and columns of the keyboard to digital pins on Arduino. Here's the connection for a 4x4 keyboard:
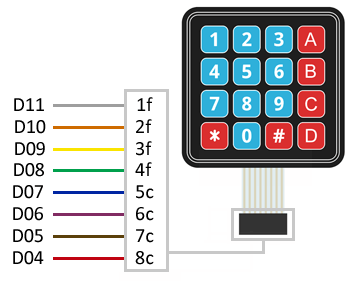
The connection to Arduino looks like this:
Code Examples
Without Library
This example scans the matrix keyboard and prints the pressed key to the serial monitor:
const unsigned long period = 50;
unsigned long prevMillis = 0;

byte iRow = 0, iCol = 0;
const byte countRows = 4;
const byte countColumns = 4;

const byte rowsPins[countRows] = { 11, 10, 9, 8 };
const byte columnsPins[countColumns] = { 7, 6, 5, 4 };

char keys[countRows][countColumns] = {
  { '1','2','3', 'A' },
  { '4','5','6', 'B' },
  { '7','8','9', 'C' },
  { '#','0','*', 'D' }
};

bool readKeypad() {
  bool rst = false;
  for (byte c = 0; c < countColumns; c++) {
    pinMode(columnsPins[c], OUTPUT);
    digitalWrite(columnsPins[c], LOW);
    for (byte r = 0; r < countRows; r++) {
      if (digitalRead(rowsPins[r]) == LOW) {
        iRow = r;
        iCol = c;
        rst = true;
      }
    }
    digitalWrite(columnsPins[c], HIGH);
    pinMode(columnsPins[c], INPUT);
  }
  return rst;
}

void setup() {
  Serial.begin(9600);
  for (byte c = 0; c < countColumns; c++) {
    pinMode(columnsPins[c], INPUT);
    digitalWrite(columnsPins[c], HIGH);
  }
  for (byte r = 0; r < countRows; r++) {
    pinMode(rowsPins[r], INPUT_PULLUP);
  }
}

void loop() {
  if (millis() - prevMillis > period) {
    prevMillis = millis();
    if (readKeypad()) {
      Serial.println(keys[iRow][iCol]);
    }
  }
}
With Library
This example uses the Keypad library to simplify matrix keyboard handling:
#include

const byte rowsCount = 4;
const byte columnsCount = 4;

char keys[rowsCount][columnsCount] = {
   { '1','2','3', 'A' },
   { '4','5','6', 'B' },
   { '7','8','9', 'C' },
   { '#','0','*', 'D' }
};

const byte rowPins[rowsCount] = { 11, 10, 9, 8 };
const byte columnPins[columnsCount] = { 7, 6, 5, 4 };

Keypad keypad = Keypad(makeKeymap(keys), rowPins, columnPins, rowsCount, columnsCount);

void setup() {
   Serial.begin(9600);
}

void loop() {
   char key = keypad.getKey();
   if (key) {
      Serial.println(key);
   }
}